Furniture restoration is a process that breathes new life into worn or damaged pieces, transforming them into functional works of art. As homeowners become increasingly aware of sustainability and the value of unique, handcrafted items, the trend of DIY furniture restoration has gained immense popularity. This approach not only aligns with the modern ethos of reusing and recycling but also offers practical and aesthetic benefits that appeal to many.
The importance of furniture restoration cannot be overstated; it allows individuals to preserve the history and craftsmanship of older pieces while providing them an updated look that suits contemporary tastes. Restoring furniture also fosters a deeper connection with the item, as it often comes with a rich narrative or sentimental value, making the process both rewarding and fulfilling. Homeowners engaged in restoration activities often find satisfaction in having created something that reflects their personal aesthetic and serves a functional purpose in their homes.
Among the types of furniture that can be restored, one may find a diverse array including chairs, tables, cabinets, and desks. Each piece presents its own challenges and rewards, from refinishing surfaces to repairing structural components. The types of materials involved can vary widely, encompassing wood, metal, and upholstery, requiring a tailored approach for each project. With the right tools, techniques, and a willingness to learn, homeowners can embark on their own furniture restoration journeys, transforming vintage or damaged items into spectacular centerpieces of their home decor.
As the trend towards home-based projects continues to rise, the allure of furniture restoration remains strong, promising not only visual enhancement of living spaces but also a profound sense of accomplishment.
Tools and Materials Needed for Restoration
Embarking on a furniture restoration project requires an assortment of tools and materials that will facilitate various tasks such as cleaning, sanding, gluing, and finishing. Having the right equipment ensures that the restoration process is efficient, effective, and safe. Below is a comprehensive list of essential tools and materials necessary for successful furniture restoration.
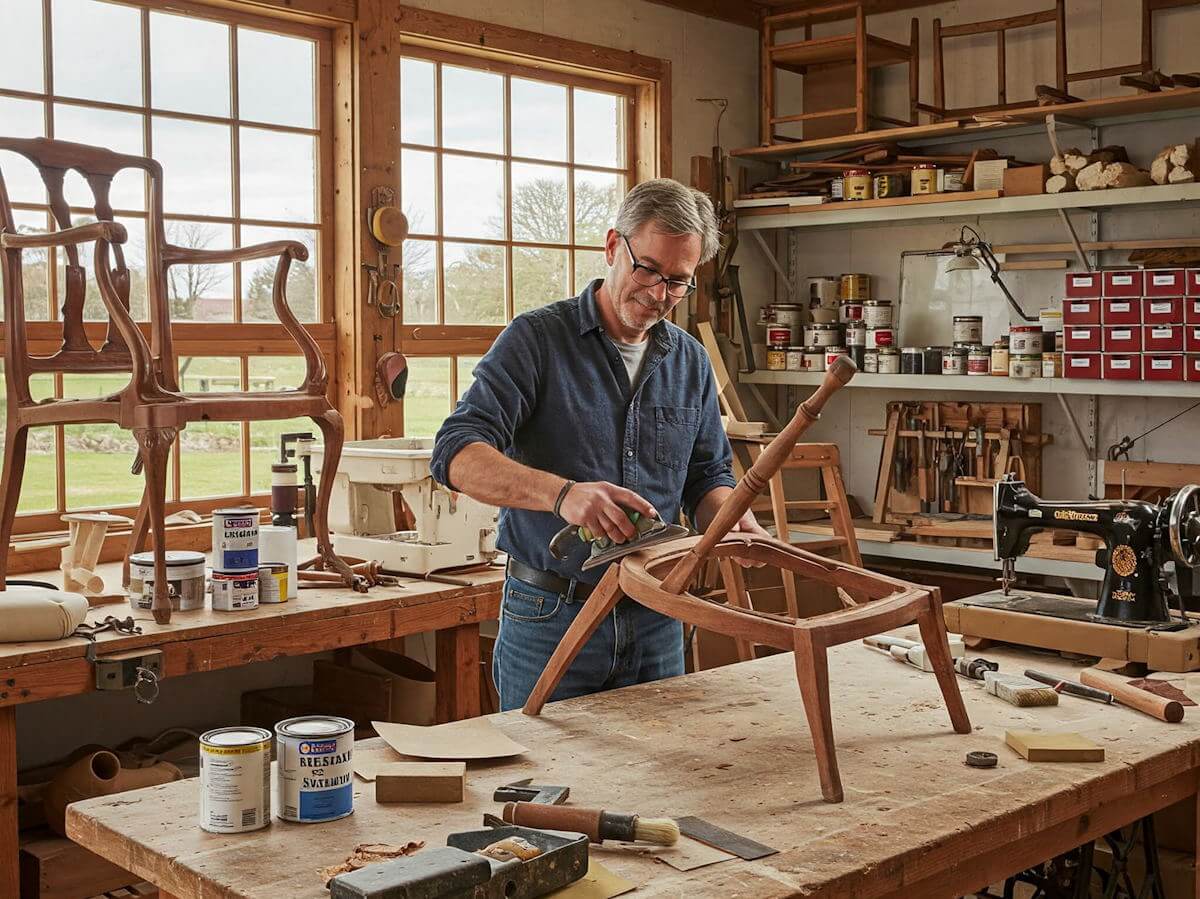
Firstly, hand tools play a crucial role in furniture restoration. A basic toolkit should include screwdrivers (both flathead and Phillips), a hammer, a chisel set, and a set of pliers. These tools will assist in disassembling furniture pieces, removing old hardware, and making precise adjustments during the restoration process. Additionally, a fine-toothed saw can be useful for cutting or trimming wood components as needed.
Power tools can further enhance efficiency and precision. An electric sander is vital for smoothing surfaces and preparing them for finishing. A drill can simplify the process of inserting screws and making holes for hardware installation. For intricate detailing, a jigsaw or rotary tool might be necessary. Always ensure to use these tools with care and follow safety protocols, as they can pose risks if mishandled.
Safety equipment is paramount in any restoration project. Protective eyewear shields your eyes from dust and debris, while a dust mask prevents inhalation of harmful particles. Gloves are essential for protecting your hands from chemicals in cleaning and finishing products. A sturdy workbench provides a safe and stable area to carry out restoration work.
When it comes to cleaning and finishing products, invest in high-quality wood cleaners, varnishes, stains, and glues. Wood glue should be strong and durable, and wood stains should enhance the natural grain of the furniture. Choosing eco-friendly and non-toxic options can also contribute to a healthier workspace. Having these tools and materials at your disposal is integral to achieving a successful and rewarding furniture restoration project.
Assessing the Condition of Your Furniture
Before embarking on the journey of home-based furniture restoration, it is essential to conduct a thorough assessment of your furniture’s condition. This critical step not only helps in identifying the extent of restoration needed but also informs the techniques and materials required for the project.
Begin your evaluation by closely inspecting the structure of the furniture. Look for any signs of structural damage, such as cracks, loose joints, or warping. These issues may compromise the integrity of the piece and necessitate repairs before any cosmetic changes can be made. Test the stability of legs and supports; if you find any wobbling or instability, it is symptomatic of underlying issues that need addressing. Using wood glue, clamps, or screws can often rectify these problems with the right approach.
Next, assess the finish of the furniture. Determine whether the surface features stains, scratches, or peeling paint. A careful inspection will reveal whether the finish can be simply cleaned or if it will require stripping and refinishing. Pay attention to the type of finish used—some may be more challenging to restore than others, requiring specialized products or techniques. Additionally, be sure to note instances of discoloration or fading that could affect the final appearance once restoration is completed.
Lastly, take stock of any individual pieces or components that might require special attention—such as upholstery, drawer mechanisms, or decorative elements. These details can often be overlooked but are vital for ensuring a well-rounded restoration effort. By documenting these aspects, you will create a comprehensive restoration plan that focuses on the unique needs of each piece of furniture, leading to a successful outcome in your restoration endeavor.
Cleaning Your Furniture: The First Step
When embarking on a furniture restoration project, the initial and critical step is cleaning the furniture thoroughly. Proper cleaning sets the foundation for any subsequent restoration work, ensuring that the furniture’s original qualities are preserved and enhanced. Depending on the material of the furniture, different cleaning techniques and solutions will yield the best results.
For wooden furniture, it is essential to use a gentle approach to avoid damaging the finish. Start by removing any dust with a soft, lint-free cloth or a microfiber duster. For deeper cleaning, a solution of mild soap and warm water can be applied with a damp cloth, followed by drying the surface immediately to prevent moisture absorption. Specifically formulated wood cleaners can also be beneficial, as they help preserve the wood’s natural sheen without stripping essential oils.
When it comes to upholstery, identifying the type of fabric is crucial, as this influences the cleaning method. For synthetic fabrics, a mixture of water and a few drops of dish soap can be effective. Using a soft brush or cloth, gently scrub the surface in circular motions before rinsing with a damp cloth to remove soap residue. For delicate fabrics, it is advisable to test any cleaning solution on a hidden area first and consider professional cleaning for heavily soiled items.
For metal furniture, such as pieces made from steel or aluminum, it is essential to focus on rust and corrosion. Begin by wiping away any loose dirt with a dry cloth. For rust stains, a solution of vinegar and water can be applied; after letting it sit, scrub gently with a scrub pad before rinsing off. Finally, dry thoroughly to prevent further corrosion.
Overall, taking the time to clean your furniture properly cannot be overstated. This crucial step in the restoration process not only enhances the appearance of your piece but also ensures the longevity of the materials involved.
Repairing Damaged Parts of Furniture
Furniture restoration is often required due to various forms of damage, including scratches, dents, cracks, or even structural issues such as broken legs. Addressing these problems is crucial for maintaining both the functionality and aesthetics of your home furnishings. The repair process can be tackled with a few straightforward techniques, ensuring your pieces regain their original charm.
For minor scratches on wooden furniture, start by cleaning the area with a soft cloth and mild soap solution. If the scratch remains visible, you can use a wood marker or a crayon that closely matches the finish of the piece. Lightly rub the marker into the scratch, then buff it with a cloth to smooth out the area. For deeper scratches or dents, consider using a wood filler. Apply the filler, let it dry as per the manufacturer’s instructions, and sand it down until level with the surrounding surface. Finally, apply a matching stain or finish to complete the repair.
Cracks in the wood can be repaired effectively using wood glue. Start by cleaning the crack and applying the glue into the fissure. Clamp the crack tightly and allow the glue to cure. Once cured, sand the area for a seamless appearance and finish it appropriately. If the damage encompasses chair legs or other supporting structures, simply reinforcing them with glue and wooden dowels can provide stability. For more severe breaks, consider cutting the damaged section and inserting a new piece of wood.
Reupholstering chairs can be an essential repair when the fabric becomes worn or stained. Begin by removing the current upholstery and cushioning, assessing any damage to the frame which should be repaired prior to reupholstering. Then, cut new fabric to size, ensuring it is securely stapled and stretched across the frame. This process not only breathes new life into your furniture but also allows for personal expression by choosing new colors and patterns.
Sanding and Refinishing Techniques
Sanding and refinishing are critical steps in the home-based furniture restoration process. Properly executed, these techniques can significantly enhance the appearance of worn-out or aging pieces, enabling them to regain their former glory. To achieve optimal results, understanding the appropriate types of sandpaper and methods for sanding is essential.
Starting with sandpaper, it is vital to select the correct grit according to the task at hand. Coarse sandpaper, typically ranging from 60 to 80 grit, is effective for removing old finishes or imperfections. As you progress through the sanding process, transitioning to medium grit (100 to 150) and then fine grit (180 to 220) ensures a smooth surface for refinishing. Utilizing a sanding block or an orbital sander can enhance control and consistency, minimizing the risk of damaging the furniture.
The sanding process itself should be approached methodically. Begin by ensuring the surface is clean and free of dust or debris. Sand with the grain of the wood to prevent scratches that can detract from the final appearance. Regularly wipe down the surface with a tack cloth or a damp rag to remove dust particles during the sanding process. Once completed, the surface should feel smooth to the touch, ready for the next phase: refinishing.
Applying new finishes, such as stains, paints, or sealants, requires careful attention. Before starting, it is advisable to test the finish on an inconspicuous area to verify the desired outcome. When applying stains, use a clean cloth or brush, working in manageable sections to avoid streaks. Allow ample drying time before adding subsequent coats. For paints and sealants, use long, even strokes to prevent drips and ensure an even application. Adequate ventilation during this process is also important for safety.
Whether you choose to stain, paint, or seal, patience and precision are key to achieving a professional-looking finish in your home-based furniture restoration project.
Reupholstering Furniture: A Detailed Guide
Reupholstering furniture can be a rewarding endeavor, enabling homeowners to refresh their living spaces with personalized touches while also extending the life of cherished pieces. The first step in the process involves selecting the appropriate fabric. Consider factors such as durability, color, and pattern to ensure the new upholstery complements the existing decor. Fabrics such as cotton, linen, and polyester are renowned for their resilience and ease of maintenance, making them popular choices for many furniture projects.
Once the fabric selection is complete, the next stage is to remove the old upholstery. Begin by carefully using a staple remover or flathead screwdriver to detach the fabric while avoiding damage to the underlying structure. Document the process by taking pictures of how the old upholstery is attached, as this serves as a valuable guide when reattaching the new fabric. It is important to inspect the padding and underlying frame for any damage; any necessary repairs should be addressed before proceeding.
Afterward, the new fabric must be cut to fit. Measure the furniture piece accurately, allowing extra material for tacking and wrapping around edges. It is beneficial to lay the new fabric on a flat surface and cut it with sharp scissors to achieve crisp edges. Next, when attaching the new fabric, start from the center and work towards the edges, ensuring the fabric is taut and evenly aligned. Use a staple gun for secure placement, periodically checking for wrinkles or bunching that may detract from the overall appearance. Finally, fold and secure the corners neatly for a polished finish.
Throughout this reupholstering process, take time to ensure that each step is executed with precision. Paying attention to details will ultimately yield a high-quality result that revives the furniture, making it not only functional but visually appealing as well.
Final Touches: Hardware and Accessories
Once the restoration process of your furniture is complete, the final touches can make a significant difference in its overall appearance and functionality. One of the most impactful ways to update a piece is to replace or enhance its hardware. Elements such as knobs, handles, and hinges may be small in size but they play a crucial role in both aesthetics and usability. Selecting modern or vintage-style hardware can dramatically change the look of the furniture, allowing it to blend seamlessly with your existing decor or stand out as a focal point.
When choosing new knobs and handles, consider the style and finish that best complements the furniture’s design. For instance, sleek metal finishes often lend a contemporary vibe, while distressed or antique hardware can communicate a more rustic charm. Utilizing a consistent theme throughout the piece—such as matching the tone and texture—will help to enhance its appeal. Additionally, the size and scale of the hardware should be proportionate to the furniture itself, ensuring functionality is preserved without compromising the design.
Furthermore, accessorizing or staging your restored furniture pieces can elevate their visual impact. Consider introducing complementary accessories such as decorative trays, books, or vibrant plants that can breathe life into the setting while providing functional spaces. The placement of lighting, such as modern lamps or soft string lights, can also enhance the allure of your restored items. Carefully curated displays can draw attention to your furniture and create an inviting atmosphere, whether in a living room, dining area, or bedroom.
By focusing on both hardware selection and thoughtful accessorizing, the final touches in your home-based furniture restoration journey can transform ordinary pieces into extraordinary focal points that enhance your home’s design.
Maintaining Restored Furniture
Proper maintenance of restored furniture is essential in ensuring its longevity and retaining its aesthetic appeal. Regular care is critical not only to keep the furniture looking its best but also to protect the investment made during the restoration process. One of the primary components of maintaining restored furniture is establishing a consistent cleaning routine. Dusting should be done at least once a week using a soft, lint-free cloth to prevent build-up, which can lead to scratches or dullness in the finish.
When it comes to cleaning surfaces, it is advisable to utilize mild, non-abrasive cleaners specifically designed for the type of finish applied during restoration. For wooden surfaces, a mixture of warm water and mild soap suffices for gentle cleansing. Avoid soaking the wood, as excess moisture can cause warping or swelling. Similarly, when cleaning upholstered pieces, a vacuum with an upholstery attachment can help remove dust and debris without the risk of damaging the fabric. Consider consulting the fabric care label or professional cleaning services for deeper cleaning protocols.
Additionally, protecting restored furniture from direct sunlight is crucial, as UV rays can fade colors and weaken finishes over time. Strategically placing furniture away from windows or using protective covers can mitigate this risk. Humidity levels should also be monitored, as fluctuations can affect wood integrity. Ideally, maintaining indoor humidity between 40% and 60% is advisable to preserve wooden structures. Furthermore, placing coasters and mats can safeguard surfaces from heat and moisture from beverages.
Avoid common pitfalls such as excessive weight on furniture or using it for unintended purposes, as these can lead to damage. By adhering to these care tips and remaining vigilant, one can significantly extend the life of restored furniture, ensuring that it remains both functional and beautiful for years to come.